Scale workloads based on the size of a rabbitMQ queue automatically, and have on-demand processing for any tasks
A sped up example of autoscaling using KEDA with a rabbitMQ setup
what & why
Kubernetes is a great fit for autoscaling, and it already has a built-in system for doing autoscaling based on the metrics-server infos, like CPU usage for a pod. It’s quite easy to do that using the Horizontal Pod Autoscaler (HPA), and I made a demo system with it (here)[/posts/kube-hpa].
But some workloads can’t scale based on a CPU usage metrics for example, and we need another metric that better describe the load being applied to the system, and how it should respond to that load.
Enter KEDA, the Kubernetes Event Driven Autoscaler. The goal of KEDA is to manage sources of metrics that can be used for autoscaling, and apply the corresponding scaling of resources.
how
Let’s say I have producers that emits messages in the queue, each being a payload to process. On the other side of the queue are workers, which can process said payloads.
This could represent a client-server model where a client would request something to be processed, and our workers would handle each request. A real-world example could be a PDF report generation service, where users can request reports to be generated from arbitrary data. Or an platform ingesting various types of incoming data (say payloads from IOT devices) where incoming traffic is very variable.
In our specific use case, the producers and workers will be simple python container, with a rabbitMQ message broker in between.
Keda provides a lot of integrations with various sources, message queues, cloud provider tools.. The list of their integrations can be found on their site.
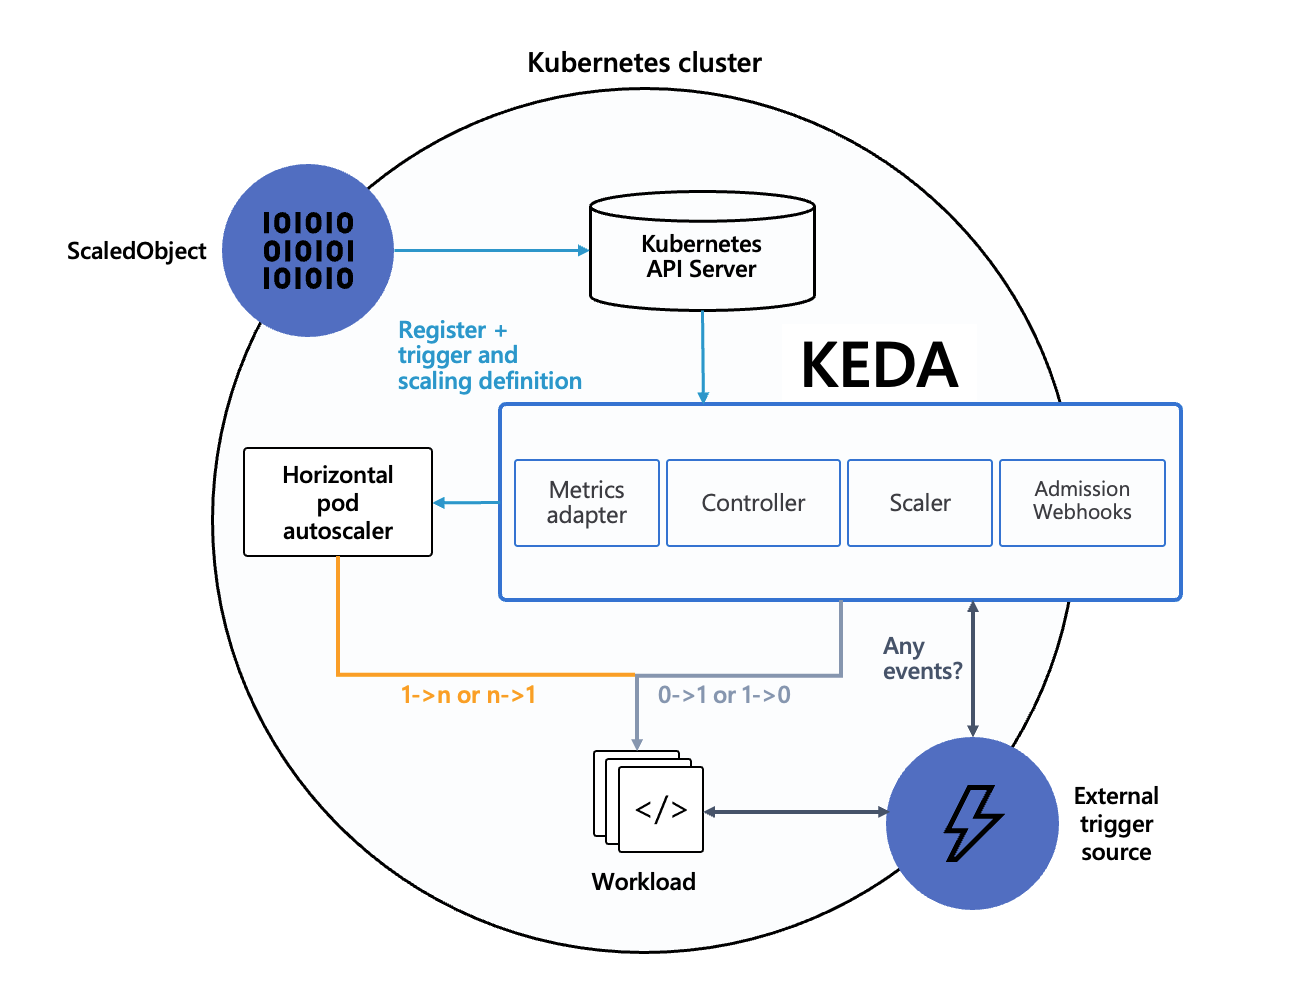
We’ll focus on the rabbitMQ integration for now, but the general flow is the same regardless of the integration:
- We instruct KEDA on the workload that should be scaled, and the settings aroung it (like the min and max number of replicas to have depending on the load),
- KEDA connects to a source of metrics that represents the
loadof the system, - Depending on the current and past metric, KEDA tells kube to scale up or down the workload.
Here is a schema of how KEDA operates:
setup
To deploy our system , we’ll use the same setup as the previous post on scaling:
# namespace
k create ns app

# rabbitmq message bus
k create -n app deploy rabbitmq --image rabbitmq:3-management --port 5672 --port 15672

# expose rabbitMQ so we can check the UI and KEDA can check its status
k expose -n app deploy/rabbitmq --port 5672,15672

# producer
k create -n app deploy producer --image=k0rventen/hpa-server

# worker
k create -n app deploy worker --image=k0rventen/hpa-worker
k0rventen/hpa-server and k0rventen/hpa-worker are the containers that act as producers and consumers based on a foo rabbitmq queue.
If we check the rabbitMQ queue, we can see the number of message is pilling up, because our single worker can’t handle the number of messages emitted by the producer. To do that, we can setup a port-forward between us and the rabbitmq interface:
kubectl port-forward svc/rabbitmq 15672 -n app
and then go to http://127.0.0.1:15672. default creds are guest:guest.
Installation
Now, let’s install KEDA, following their documentation:
helm repo add kedacore https://kedacore.github.io/charts
helm repo update
helm install keda kedacore/keda --create-namespace --namespace keda
You should now have a few pods running in the keda ns.
> kubectl get pods -n keda
NAME                                               READY   STATUS    RESTARTS   AGE
keda-operator-7879dcd589-65t4x                     1/1     Running   0          10m
keda-operator-metrics-apiserver-54746f8fdc-fs4kb   1/1     Running   1          11m
Using scalers
Then, we’ll need to connect KEDA to our rabbitMQ queue. KEDA works based on scalers that connects to the source of metrics that should be used for scaling, We’ll also tell KEDA which deployment is our target for autoscaling:
apiVersion: v1
kind: Secret
metadata:
  name: keda-rabbitmq-secret
data:
  host: "aHR0cDovL2d1ZXN0Omd1ZXN0QHJhYmJpdG1xLmFwcDoxNTY3Mi8v"

---
apiVersion: keda.sh/v1alpha1
kind: TriggerAuthentication
metadata:
  name: keda-trigger-auth-rabbitmq-conn
  namespace: app
spec:
  secretTargetRef:
    - parameter: host
      name: keda-rabbitmq-secret
      key: host

---
apiVersion: keda.sh/v1alpha1
kind: ScaledObject
metadata:
  name: worker-autoscaler
  namespace: app
spec:
  scaleTargetRef:
    name: worker
  minReplicaCount: 0
  maxReplicaCount: 20
  pollingInterval: 2
  cooldownPeriod: 20
  advanced:
    horizontalPodAutoscalerConfig:
      behavior:
        scaleDown:
          stabilizationWindowSeconds: 20
          policies:
          - type: Percent
            value: 50
            periodSeconds: 20

  triggers:
  - type: rabbitmq
    metadata:
      protocol: http
      queueName: foo
      mode: QueueLength
      value: "20"
    authenticationRef:
      name: keda-trigger-auth-rabbitmq-conn
The file contains the following ressources:
-
A secret which contains the full URL of our rabbitmq instance. Decoding it gives
http://guest:guest@rabbitmq.app:15672//.This is the URL that KEDA will use to connect to RabbitMQ. Note that we specify the namespace of the
rabbitmqservice, because KEDA will try to connect to rabbit from its own pod in thekedanamespace. The last/in the URL is the name of the rabitmq vhost, which by default is /. -
a TriggerAuthentication CRD that references the secret above, and binds it to a
hostkey. -
a ScaledObject CRD that defines our autoscaler:
- the ressource to scale using
scaleTargetRef, which is ourworkerdeployment, - various config settings regarding the scaling (min/max number of replicas, polling rate & cooldown after a ramp up),
- a
horizontalPodAutoscalerConfigobject that defines the behavior of the HPA:- the policy here defines that half the pods can be stopped every period (20s) in a cooldown phase (when the load lightens).
- triggers that are used to scale the ressource:
- in our case:
- scaling should occur based on the length of the rabbitmq queue
foo, and scale workers every20messages in the queue - and to connect and authenticate to rabbitmq, KEDA shoud use the secret we created.
- scaling should occur based on the length of the rabbitmq queue
- in our case:
- the ressource to scale using
We can check on the state of the autoscaler by checking on the ScaledObject ressource :
> k get scaledobject -n app
NAME                SCALETARGETKIND      SCALETARGETNAME   MIN   MAX   TRIGGERS   AUTHENTICATION                    READY   ACTIVE   FALLBACK   AGE
worker-autoscaler   apps/v1.Deployment   worker            1     20    rabbitmq   keda-trigger-auth-rabbitmq-conn   True    True    False      4m12s
If everything went alright, the autoscaler should increase the number of replicas of our worker, to match what is defined in our autoscaling rule.
We can influence the number of workers created by adjusting the number of producers:
> k scale deploy -n app producer --replicas <int>
And we can watch the number of workers at the same time:
> kubectl get pods -n app -w
NAME                        READY   STATUS    RESTARTS      AGE
producer-5d9cb496cc-dvk2r   1/1     Running   0             28s
producer-5d9cb496cc-dwx77   1/1     Running   0             28s
rabbitmq-58ff5479cf-6657s   1/1     Running   0             67s
worker-58b8d8c67f-btv4q     1/1     Running   0             7s
worker-58b8d8c67f-v75lb     1/1     Running   0             17s
worker-58b8d8c67f-6hbss     0/1     Pending   0             0s
worker-58b8d8c67f-6hbss     0/1     Pending   0             0s
worker-58b8d8c67f-6hbss     0/1     ContainerCreating   0             0s
Another great advantage of using a message queue and this approach is that if no messages are in the queue, there is no need to have any worker at idle.
If we lower the minimum number of workers to 0, and if the queue does not have any messages for a given period of time, KEDA will simply scale to 0 the workers. And if a message is pushed to the queue, this will be trigger KEDA to scale up the workers to handle the request. That’s pretty handy in situations where we want ‘on-demand’ scaling based on the current load.
We can tweak the various parameters to improve the responsiveness of the scaling using
Screencast
The screencast above is a 10 minutes run of the tutorial shown here, 2000x speed. The rabbitMQ interface shows the number of messages in the queue, while the terminal shows the pods being created/terminated by KEDA depending on the load.